Showing posts with label pictures. Show all posts

Monday, August 15, 2011

Slow Cooker Pot Roast

Ingredients
2 cans Cream of Mushroom Soup (10.5 oz each)
1 package French Onion Soup mix
2 1/2 cups water
1 tbsp. garlic salt
2 tsp black pepper
3 1/2 - 5 lb roast 
6 medium potatoes, large dice
4 carrots, large slices
4 stalks celery, large slices
1 onion, large dice

Directions
Mix canned soup, soup mix, water, garlic salt and black pepper in your slow cooker. Add roast and cover with veggies. Cover and cook on low heat for 8 hours.

Sunday, May 22, 2011

Sausage Gravy

Yummy!
Adapted from a recipe we found on Homesteading Today

Sausage Gravy

Ingredients
1 pound sausage
1/3 cup flour
4 cups milk
Salt and Pepper to taste

Instructions
Fry sausage. Remove sausage and leave drippings in skillet. Add flour to the drippings in the pan and let flour brown. Add milk and spices. Stir constantly until thick. Return sausage to pan and heat through. Serve over biscuits (I use this recipe without adding the cheese).

Comments
We use Jimmy Dean Sage sausage and I add a couple dashes of crushed red pepper because Matthew likes the extra sage and I like my sausage hot. The sausage we use doesn't really make enough drippings to coat the flour so I added a couple tablespoons of butter to the pan after I removed the sausage and before I put in the flour.

Saturday, May 14, 2011

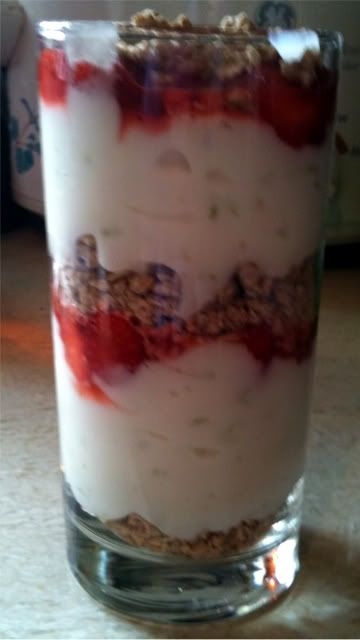
Yogurt Parfait

Yogurt Parfait
I got this idea from watching Tyler's Ultimate this morning.

Yogurt Parfait

Ingredients
2 cups plain nonfat yogurt
1/4 cup sugar
1 tsp. vanilla
Zest of 1 lime
1/2 cup granola
1 cup fruit

Directions
Mix the yogurt, sugar, vanilla and lime zest in a bowl. Between two tall glasses, layer 1/3 of the granola, with 1/2 of the yogurt and 1/2 of the fruit. Layer ingredients again in the same order and top with remaining granola. Serves two.

Comments
I used fresh strawberries from the garden that had been covered with a tablespoon of Splenda just to get some juice. I also juiced the lime that I zested into the berries. In the yogurt mixture, I used Splenda instead of sugar.

Hypersmash

Saturday, May 7, 2011

Seed Selection

I think starting your own seeds is a very important part of gardening. There is, by far, a greater variety of seeds available than plants that have already been started. Between all the seed companies online, you are sure to find that one special variety you have been itching to test out in your garden. The most important thing is the greater availability of heirlooms seeds.

Most seed companies sell their special hybrid seeds, which is good for you because they can combine the best characteristics of two different strains of the same vegetable in hopes of a superior product. It is good for them too because if you want that same hybrid once the seed packet is empty you have to buy more from them, which is in turn bad for you. If you sprout seed from a hybrid fruit you aren't guaranteed to get the exact same plant as the original. There is often even variation in separate plants grown from seeds of the same hybrid. It is the nature of genetics.

If you grow plants from heirloom seeds, save them, and then sprout them the next year you will get an identical plant. That means you don't have to buy more seed, you just grow them.

As always, there is some 'fine print'. Some plants are a pain to let go to seed. I never plan to harvest seed from lettuce because they are just so small I don't think I have the patience. Also, we like growing a Mesclun mix of leaf lettuce, but to grow our own seed mix we would have to collect seeds from each type of plant.

Be wary of cross pollination. If you plant two types of heirloom tomatoes side by side and the wind blows just right (or a bee goes from one plant to the other) they will cross pollinate and then boom, you have your very own hybrid. That is not necessarily a bad thing, it is just unpredictable.

I don't want this to come across as a rant against commercial hybrids. I use them, most of the seeds and plants I am using this year are just that. They have their place. I am using them this year because I got off to a late start and didn't have time to sprout my own. I specifically went after the disease and heat tolerant hybrids since I have had a problem with each in the past.

I also save hybrid seeds to see what kind of plant the second generation is; not as a main crop that I depend on for food but as an experimental one. At my heart, I have a scientific nature and a good portion of my garden is experiments in progress. I suggest you do the same, carve out at least some space in a garden devoted to experiments. Try a new hybrid to see how it performs. Try a new growing method such as growing melons on a trellis or potatoes in a box of hay. Or, just sprout some seeds from your favorite hybrids from the last harvest. You won't necessarily get the exact same kind of plant, but you may end up with a superior one. If the experiment fails, you still have the rest of the garden full of reliable plants. If it succeeds, well then you have a new trick to add to your gardening know-how checklist and you have more tasty food to eat.

I buy heirlooms, when possible, because I like to have the option of saving seeds and like having a pretty good idea what I can expect from the plants grown from those seeds. I also prefer heirlooms because they are the old and tried-and-true strains that have been productive for generations.

A big part of homesteading for me is to carry on traditional practices that people used time and time again in the past but seems to have been mostly forgotten by the last two or three generations. Another big part is sustainability. Saving heirlooms seeds fulfills both of those. Saving your own seeds has one more important advantage because you can save seeds from your healthiest and most productive plants. By productive, I don't mean focus solely on the plant that made the most fruit but the one that produced the most of the fruit you wanted. If you buy a couple beefsteak heirlooms plants (like I did), even though they are the same strain, each plant won't have the exact same tomatoes. If one plant has mostly 1 lb. tomatoes but the one beside it produced smaller fruit that had a better taste, you have to make a conscious decision whether you want to help natural selection along with the goal of larger tomatoes or better tasting tomatoes. When saving seeds it is important to pick out your best fruit or vegetable from the healthiest plant to increase the chances for a successful harvest next year. If you continue to do that for a couple years you will have a strain that, through natural selection, has the best characteristics for your own little micro-climate, your own perfect strain, for free.

This started out as a post on how to make seed starting boxes but, as is a habit of mine, I just sort of hopped up on my soapbox and rambled away.

The box instructions will be in the next post...I hope...

Seed-starting Boxes

And because I feel guilty when I have a post without pictures of my dogs, here are some failed attempts of getting a nice picture of all three sitting together.

Murphy says, "Don't mind me. I'm just passing through."

No, we won't look at the camera no matter how many times you ask

The stick is calling to me!

*sniff sniff* You smell that?! Someone just put hotdogs on the grill 2.37 miles that way!

Saturday, April 30, 2011

Margarita Cake

This is a take on my Taste of Summertime Cake.


Margarita Cake
Margarita cake with strawberries

Ingredients
3 cups all-purpose flour, sifted
1/4 teaspoon salt
Zest of 2 limes
5 large eggs
3 cups granulated sugar
1 ½ cups butter
1 cup Jarritos lime soda
2 teaspoons triple sec
2 teaspoons tequila

Instructions
Heat oven to 350 degrees F. Grease a 12-cup tube pan. Combine flour, salt and zest in a bowl. With a mixer, cream butter and sugar at high speed until light and fluffy. Add eggs one at a time, mixing well after each addition. Reduce speed to low; add dry ingredients and soda, beginning and ending with dry ingredients. Add the liquors and mix until just combined. Spoon evenly into prepared pan and bake 1 1/2 hours or until wooden pick inserted in center comes out clean. Cool in pan 15 minutes. Invert onto wire rack, remove pan and cool completely.

Margarita Glaze

Ingredients
2 cups confectioners' sugar
Juice of 2 limes
1 tablespoon triple sec
1 tablespoon tequila
½ teaspoon salt

Instructions
Combine ingredients and beat until smooth. Add lime zest. Drizzle over cooled cake.


Wednesday, April 27, 2011

Pallet Projects

I don't know if it is because I have been building little things out of wood since I was young or if it is just a quirk of homesteading, but it seems like there is always some small something or 'nother that needs to be built. Luckily, I work in a warehouse with a good supply of pallets.


There are some downsides to re-using pallets. The wood is not the highest quality and breaking down the pallet is time consuming. I usually could build my current project from new wood in less time than it takes me to reclaim what I need from a pallet and time is a precious resource. But, so is money and the pallets are free so, I am really just trading my time to save money.

There are as many, if not more, advantages; the largest being that every bit of wood and nail I reuse is something saved from a landfill. I started by taking only the double-length and odd sized pallets that would have gone to the dumpster but, as I think of more things to do with reclaimed pallet wood, the more I start eyeballing the nicer pallets that would mostly likely be reused by someone else.

The pallet wood has character. Most of the time it is rough cut, often with knots, bows, splits, and breaks. Even on the same pallet, most of the slats aren't the same thickness since many have been repaired at a couple points in their lifetime. They are darkened by age, stained, and covered in the insidious 'warehouse dust'. That character gives the finished product a rustic feel that fits right in with rest of the homestead. The challenge is to take this ragged wood and put it to the best use.

I have built a few things already from this retired wood:


A 6-hen nest box


A hopper feeder for one of our rooster pens that holds 5 gallons of feed. You add feed from the top and it drops down into the trough as the chickens eat it.


A cold frame

A seedling box


The seedling box is 12”x24”. An upcoming post will be directions on how to build one, but the example will be a 12”x12”. You can put soil directly into them or, of course, use small pots like I did in the picture.


Framing raised beds in the garden using two slats nailed together for stability


This bed is framed using the 2x4 runners from the double-length skids


Unfortunately, every time I finish one pallet wood project I think up at least 2 more.

Some things I hope to build in the near future:
  • Chicken Tractor
  • Greenhouse Foundation
  • Potting Table
  • Shade Shelters for the Chickens
  • Garden Bench/Chairs

I am sure there will be more before that list is complete. Good news is that there are more pallets for the taking than I have time to break apart.

Monday, April 25, 2011

Spring 2011 update

So, I finally had some time to make an update. Now that it is actually spring and we are doing farm time things, I have something to write about.

We finished fencing in the garden finally. Sorry the pic is a little blurry, was taking pics quickly while there was light.

Photobucket


It is 48'x20'.

We got it tilled, which was absolutely no fun. Established centipede sod has some mighty deep roots to dig though.

Garden before tilling

Photobucket


In process of tilling

Photobucket


We found an old foundation in one corner of the garden.

Photobucket


The blocks were about 4-6 inches below the ground and made of solid concrete in a partial rectangular panel. The tiller wasn't too happy since I kept running into them once I thought I had dug the last one out. It was quite a surprise since Krystal's grandparents had the land since the early 50's and no one remembered a building being there.

After tilling

Photobucket


For the first tilling, we rented a front tine for the weekend. Of course 2 weeks later the grass was making a strong comeback. Luckily, which is not something I say in regards to myself often, we found a used tiller for sale online just a couple miles from our place. It works great and cost about 1/3 the price of a new one.

Last weekend we bought some tomato and pepper plants from the local farm store and got them planted. The spring kinda sneaked up on me and I never got around to starting my own plants so we bought some local ones.

Photobucket


We have just gotten started, we still have to lay down a frame around most of the beds, get the beds leveled out and soil amendments added.

Tuesday, July 13, 2010

Farm Picture of the Day: Stormy Weather

We may not have had a lot of rain but we've either had some wind or the limbs on the pear tree are getting too stressed. I did thin the pears but apparently they are still weighing the tree down too much.

Saturday, July 10, 2010

Farm Picture of the Day: Raining!

Our yard looks so brown because we have not had much rain this summer.


Luckily, we are finally getting a little bit of rain this afternoon.

Thursday, July 8, 2010

Farm Picture of the Day:

A year ago, we had our first hatching.

Wednesday, July 7, 2010

Picture of the Day: Mr. Sneaky


One day this quail just showed up and started hanging out with our chickens. At the request of a friend, we named him Mr. Sneaky.

Tuesday, July 6, 2010

Farm Picture of the Day: Eggs

The results of today's egg gathering.

Monday, July 5, 2010

Farm Picture of the Day: Herding and Chickens

Two pictures today.

Beavis crowing

The rut that Brogan has made around the chicken coop from his "herding."

Sunday, July 4, 2010

Farm Picture of the Day: Pears

Our pear crop is looking good this year, so far. We pruned the trees in late winter and thinned the pears once they started growing a little bit to give them some room to grow. They should be ready to pick at the end of August. I'm thinking pear preserves may be in my future.

An Update of Sorts

We haven't posted here much this spring and summer because we haven't really been doing much around the farm. We started fencing off our garden area early in the spring. We had all the posts put in and 1 1/2 sides fenced in with wire.

Matthew ended up getting sick with a lingering infection that we finally got cleared up within the last month and, now, we noticed the 2" x 4" welded wire we used is too loose because the posts are so far apart. So, we have undone the worst of the fencing and have started to reposition the posts so they are closer together.

We got 2 of the 5 posts in today but with the heat and the lack of rain making the ground so hard, that was as far as we got. Hopefully, we will get the other 3 posts done this week and will be able to get the ground tilled soon so that we can have a late summer/fall garden.

Sunday, November 8, 2009

Pumpkin Pie Bread

I have been craving both pumpkin and gingerbread for the last two weeks so, today, I combined them and created pumpkin pie bread.

Ingredients
2 1/3 cups all-purpose flour
1/2 cup brown sugar
1/2 cup molasses
3/4 cup water
1 cup pureed pumpkin
1 large egg
1/2 teaspoon salt
1 teaspoon baking soda
1 teaspoon ground ginger
1 teaspoon ground cinnamon
1/4 tsp nutmeg
Dash ground cloves

Instructions
Grease and flour a 9-inch pan. Preheat oven to 325 degrees. Combine all ingredients in a mixing bowl and stir until combined (should be the consistency of muffin batter). Pour the batter into the prepared pan. Bake for 45-50 minutes, or until a toothpick inserted into the center comes out clean.

Tuesday, July 21, 2009

Chick Pictures

The chicks are now 2 weeks old. They grow really fast and don't stay in the cute fluffy chick stage for long.

The chicks are scared because I took the top off their box to change their water.

You can really see the feathers starting to come in on the chicks. The one in the front has a comb growing in and starting to turn red. I think this one may be a roo but time will tell.

The "roo" playing it up for the camera.


-Krystal

Tuesday, July 14, 2009

Garden and Chicken Pictures


Photobucket
Watermelon growing on a trellis

Photobucket
JalapeƱos!

Photobucket
Yellow Squash

Photobucket
Tomatoes

Photobucket
Something is going on with our tomato plants and they seem to be dying.

Photobucket
Purple-hull Peas

Photobucket
Okra

Photobucket
The chicks are one week old today (well, five of them today and five yesterday)

Photobucket
We're starting to see a lot of wing and tailfeathers growing in, now.

Photobucket
Chicks

-Krystal
4yj3xawhdt